First published on the 1st Feb 2017. Updated on the 16th of February 2021
![]()
Welcome to the Trading Guide!
I hope to bring you my veteran techniques & other tricks that will make your life as a trader much smoother!
Other guides:
Exploration | Mining | Piracy | Combat | Passengers | AX Combat
![]()
Summary:
The role: Trader
As a trader, your goal will be to buy items at low prices in order to sell them back at higher prices.
What qualifies a good trader?
- A cargo ship, the biggest the better!
- Depending on your route and your ship, weaponry is optional. A Keelback for example can be equipped comfortably with defensive measures.
- Modules, a good FSD drive, and generally light equipment to escape from other players and NPCs while keeping your jump range high.
- The highest jump range possible! 30LY is excellent when you’re emptied from cargo, but once you’re full, you will usually jump max at 15LY.
- Trader’s tools on the glorious internet!
- Alertness and patience. You’re a hauler, if a fighter wants to attack you they will have the speed and power advantage. Your best defenses are a great & smart escape and defensive utility modules.
Ships and modules
Every ships can trade in Elite: Dangerous… but some are of course better than others.
Let’s see what Elite: Dangerous offers to maximise your profit.
► The first important mod to have is the Enhanced FSD Drive to jump farther, thanks Mrs and Mrs Engineers!
→ The goal is to have the longest jump range, to be as light as possible with your toolset and to keep in mind your security.
If you need it on long trade routes, take a Fuel Scoop.
Try and get the smallest A Rated Powerplant to increase your Jump Range.
► Every ships prepared here have their own shields to protect the cargo.
It will allow you to dish out some damage while you charge your FSD to escape any incoming danger. You can swap it for more cargo racks… be careful in Open World!
- The Hauler ? Yes but no thanks. It is excellent to start out and carry out Transport Missions thanks to its large jump range and reasonable cargo, but not for trade routes as the Adder does it better thanks to more cargo capacity.
- Adder (26.18LY → 35.98LY / 26u) – 1M518k credits // Beginner edit, no mods
- 460m/s when you boost, it is very fast not only to dodge your enemies but also to dock/undock rapidly to the stations. Feel free to equip a Class 1 Guardian FSD Booster if you want to jump even further.
- Cobra Mk III (29.53LY → 34.82LY / 48u) – 6M153k credits // Beginner edit, no mods
- With 612m/s, nobody can match your speed and catch you… but be careful not to crash your ship in the stations!
- Cobra Mk IV (24.75LY → 31.85LY / 84u) – 6M 432k credits // Beginner edit, no mods
- It is much slower than his brother but it also offers double cargo for almost the same price. It is also much more robust and you have enough space for a Guardian FSD Booster.
- Type 6 (26.63LY 38.18LY / 106u) – 8M 216k credits // Beginner edit, no mods
- My favourite small ship for hauling, it has everything you need where it is needed while being very flexible.
- Keelback? Why not, however this ship is combat/transport oriented ie you will want to make it more powerful and resistant, at the expense of freight and this will often lead to less than 50 cargo units.
- Asp Explorer (41.08LY → 50.31LY / 118u) – 34M 596k credits
- The best medium-sized ship: a long jump range and enough cargo to trade.
- Type 7 (23.92LY → 35.96LY / 278u) – 80M 457k credits
- Only dedicated to Trading, Lakon’s Type 7 will be your first ally in the large ships array. The jump range starts to crumble a bit compared to the AspX, but it is common to large vessels. Add a Guardian FSD Booster if needed.
- Imperial Clipper ? Why not, but the Type 7 does better for less credits without asking an Empire rank. The Clipper is much faster however which makes it an excellent Pirate ship.
- Python (22.71LY → 33.3LY / 278u) – 220M 629k credits
- « Hey, but the T7 does better, right? » Yes… BUT, the Python is a medium ship so you have no landing pads restrictions and you can dock anywhere, and that’s worth gold. From the Python on, I fit Electronic Countermeasures in order to counter the torpedoes & missiles and their nasty effects on the Shield Generator and the FSD drive. It is moreover to counter these weapons that all the Powerplants are fitted with Armoured mods.
- Type 9 (26.62LY → 36.62LY / 742u) – 355M 303k credits
- The Type 9 is in my eyes the best transport ship in the game today, it hardly ever needs fuel, jumps relatively far once modded and has a lot of cargo.
- Anaconda (25.55LY → 33LY / 422u) – 590M 825k credits
- If you have no mods, I feel it’s better than a Type 9… but once you add mods, I prefer the Type 9.
- Imperial Cutter (31.61LY → 40.80LY / 712u) – 988M 790k credits
- Three times more expensive than a Type 9 for less cargo and a slightly better jump range but also a much higher speed. It all depends on what you make of it, but the quality has its price and it is pleasant to pilot.
- An additional fit if you are tempted by a large ship, a little more threatening with a combat capacity (against NPC): Type 10. Its main role is for AX Combat.
To unlock the Guardians modules, follow our Crafting Guides, Tech Brokers.
![]()
About Trading
There are several ways to trade goods in Elite: Dangerous: Rares, Cycles and Mining.
The first one aims to travel very long distances in order to sell back luxury goods (rares) produced only in certain systems, the second one connects a few stations to each other in order to make the most profit as quickly as possible by going back and forth between them. And finally, the metals and minerals mined are then sold in stations depending on their economies.
If you were to gain experience only on Trading:
- Sidewinder & Adder : Transport & Trading Missions
- Cobra MkIII to AspX : Rares Trading (actually unbalanced and it results in poor profits, start Cycling)
- Type 7 to Cutter : Cycles Trading
Rares Trading
When you get a Cobra or a T6, the Rare trading should not be overlooked since with 164 units to 200 units of cargo, you could earn about 6M credits per hour! Above 200 units of cargo for your ship, stop the Rare and get into business with Cycles.
NOTE: Actually, the Rare Trading is not something you should do for profit, as Cycles have become the new meta even at a low stage with a few hours of game time.
In short:
- 1h30 for a complete cycle, if your ship doesn’t have Mods, and less than 1h if you are Modded.
- Fuel Scoop essential, if your ship doesn’t have Engineer Mods (Fuel Scoop Class 2 for Cobra and Class 3 for a Type 6).
- About 30,000 profit credits per item sold (<15k 50k>)
The concept is simple, the « rare » commodities on the market are yellow, a lighter yellow than the other commodities.
Buy the entire station stock, then go to the next point and do the same. Follow the map below.
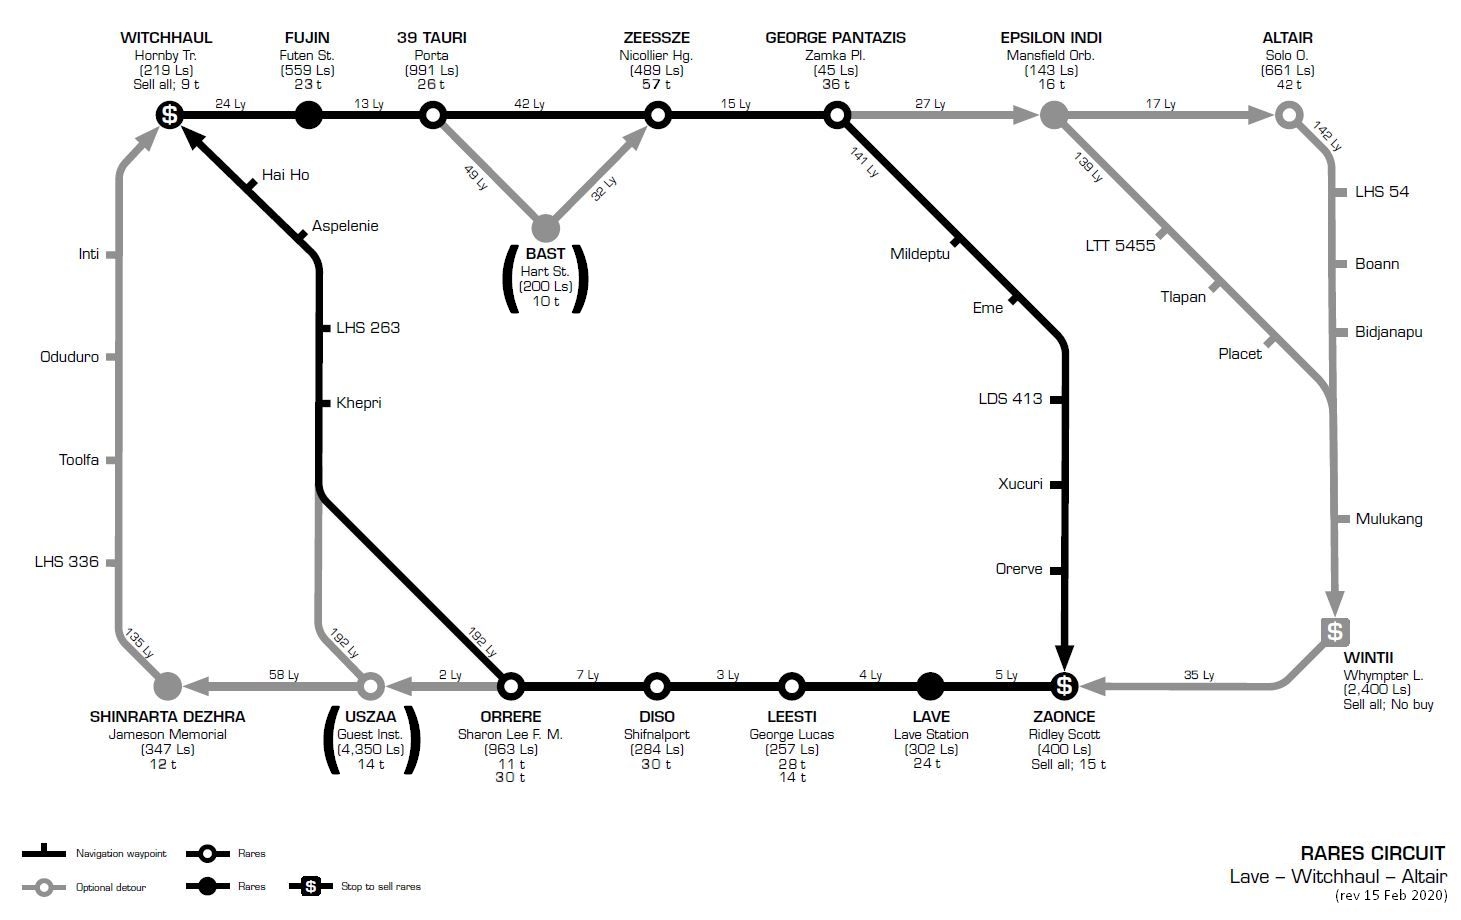
There are a lot of routes with rare commodities, it’s up to you if you want to create your own troudes!
A few tips:
- Try to keep a maximum of 2 jumps per clusters of systems where you buy your Rares;
- Sell your rare between 145 to 180 LY from the point of purchase;
- A ship whose speed is very high (555m/s is excellent for example) is recommended in order to minimize the time to land/take off;
- 6s from the station, in supercruise, reduce your speed to 75%;
- 5Mm from the station, engage 100% speed;
- Lakon ships have an excellent armour, don’t be afraid to boost and accelerate. Repair your ship at each station;
- Even if you are too close to the star, activate your FSD, you have heatsinks to activate.
With these long journeys you will have to scoop fuel from the stars. Some can be scooped using a Fuel Scoop and others are not eligible like the brown and red stars for example. The stars are of various classes and the scoopables are the stars A, B, F, O, G, K, and M.
Remember this trick:
- Always
- Be
- Fueling
- Or
- Gonna
- Kill
- Myself
Cycles Trading
From 200 units of freight, you are on the Elite path! The Cycles Trading is quite annoying when you go back and forth many times, but it is the most profitable.
Prepare for bigger thrusters, book your large landing pads and we’re off!
There are two kinds of Cycles: Quick ABA & Developed ABA/ABCA
QUICK ABA
First, I invite you to visit EDDB and fill the requested information:
- Your location
- Your max jump range LADEN x3 max
- The size of your ship (Light, Medium, Large)
From here, the website will provide you with the best stations to trade with, and which items to buy and sell between two systems in order to get the most profit out of it!

DEVELOPED ABA/ABCA
The trading in Elite: Dangerous is very developed and exciting feature if we understand it correctly. In-game, open your galaxy map and then click on the View tab.
I advise you to establish yourself near high-tech, industrial, extraction, refinery high-population systems; From 5-10M inhabitants.
These are the best combos that will quickly produce their commodities, have a high import/export rate and trade excellent items with each other.
There are multiple economies, here are the best trades you could make:
- Extraction and Industrial to Hightech
- High Tech to Refinery
- Refinery to Industrial
- Industrial to Agriculture
- Agriculture to Extraction
- (Services, Tourism, Military and Terraforming aren’t interesting at the moment)
Two methods are available:
Open the ED Trader bible, it will help you understand how the Production/Demand system works for the commodities and stations economies.
◘ The old way, ‘cuz you kno da wae
- Check the economy of your system and your surrounding systems in order to choose an interesting trading route. You can go ahead with an ABA or ABCA.
- Pay attention to the systems with several stations, check each of their economies.
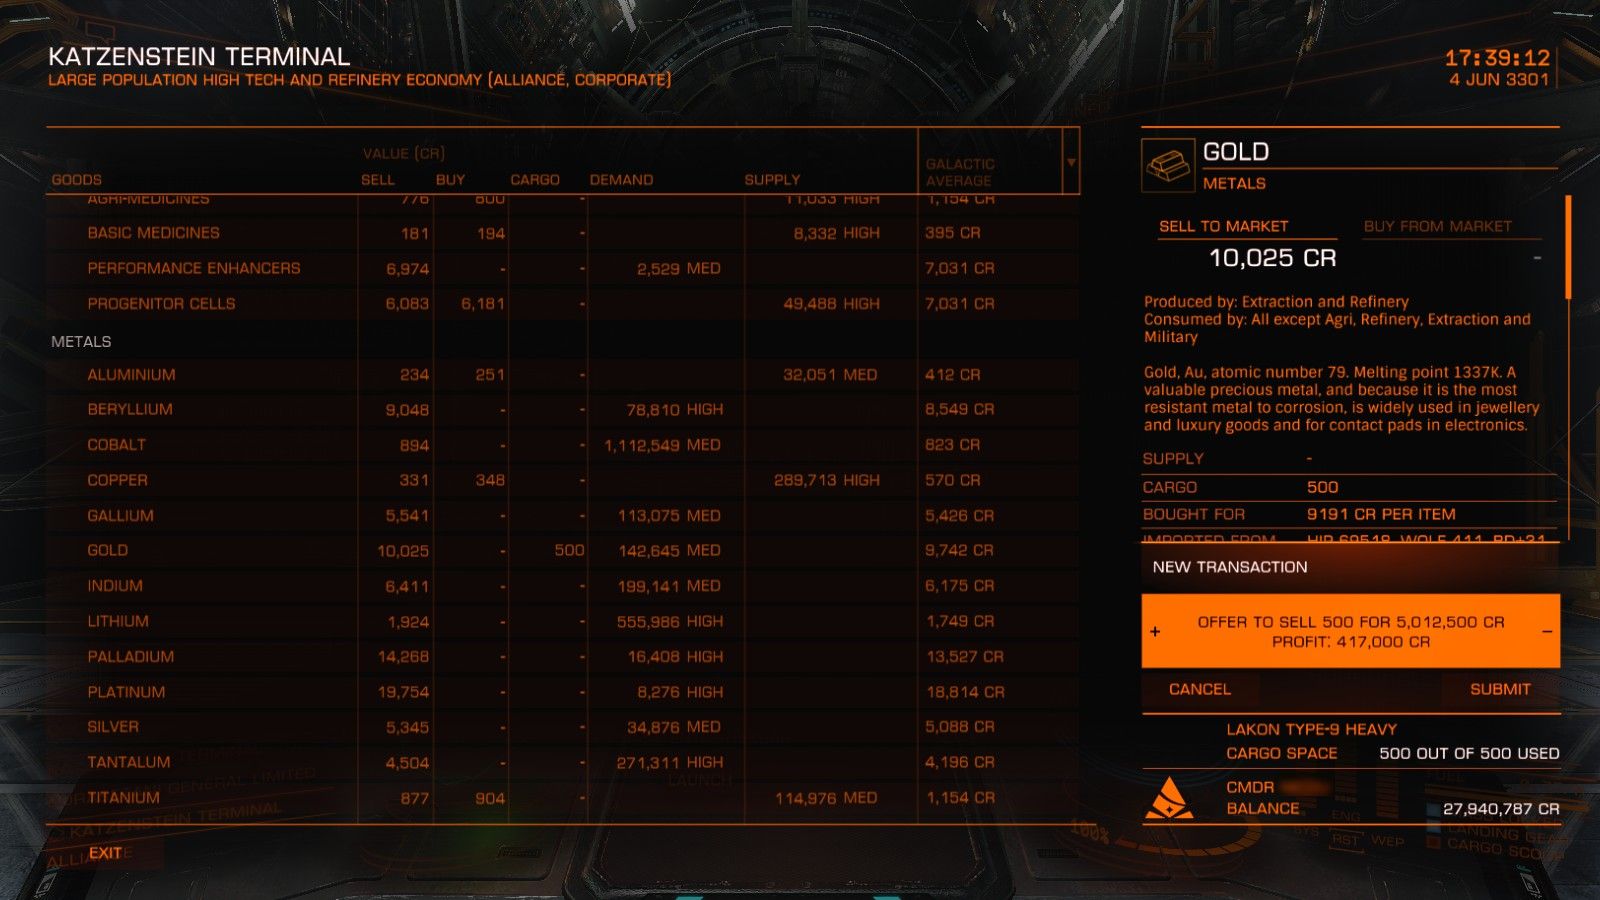
- A trade between an Industrial/High-tech station ↔ Refinery/Extraction (Progenitor Cells ↔ Gold) will bring you a lot of credits!
- Pay attention to the systems with several stations, check each of their economies.
- Check the list of items that might fit earn you a good amount of credits in system A, buy one of each and then finish your freight with the most resourced good.
- These goods are often: Gold, Beryllium, Progenitor Cells, Consumer Technology, Superconductor, Performance Enhancers, Indite, Bertrandite, Advanced Catalysor, Resonating Separators, Polymers, Imperial Slaves, Battle Weapons…
- Go to the system B and target the station where you will sell all your items. Keep in mind the item that brought you the best profit.
- Do the same when you go back to system A and keep in mind the best selling item again.
- Here is your trading route!
◘ With the Ingame Tools
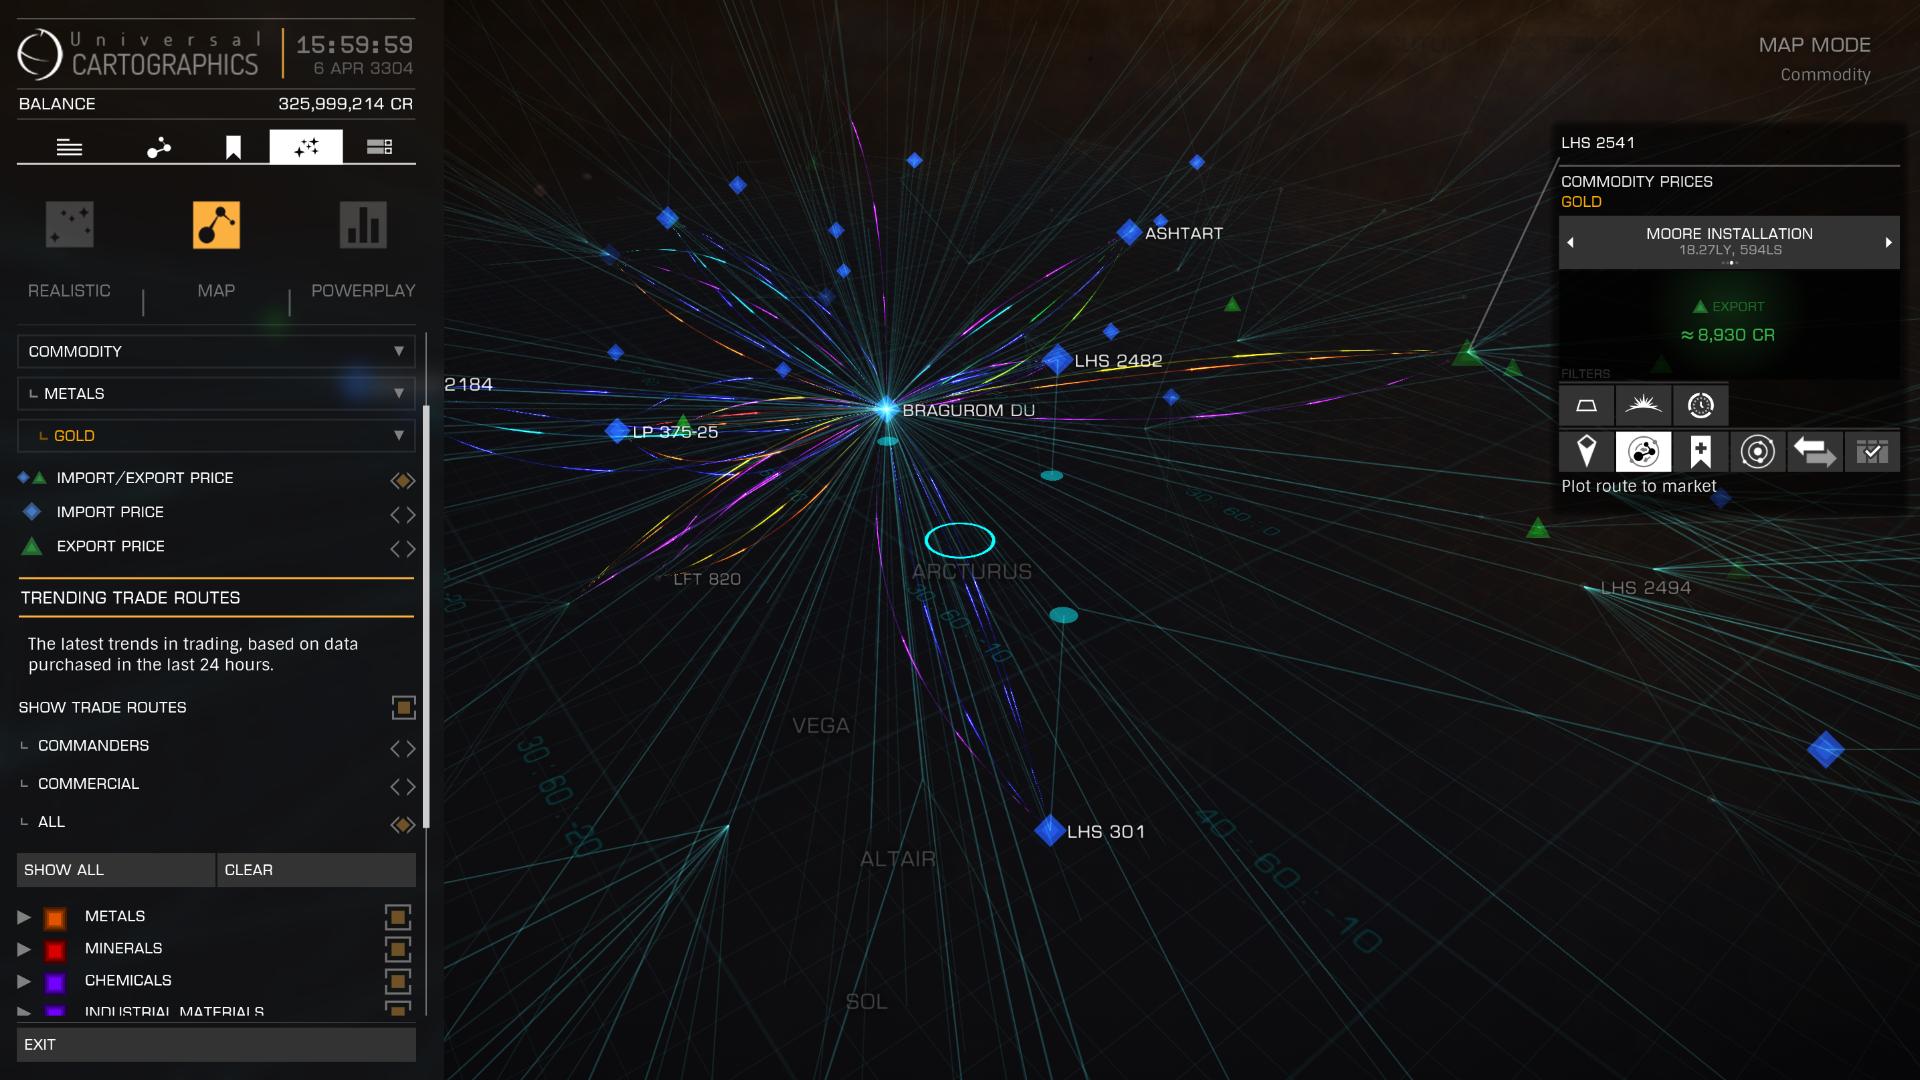
In-game, open the galaxy map then fourth tab to display the detailed map. You will have many filters here, select « Commodities ».
Here I’m trading Gold, but you can test each of the other commodities if you want.
- Export is in Green, Import is in Blue.
- To obtain the Trading Data, you must either: land at a station in the system that has a market, scan the navigation beacon, or purchase Trading data via the galaxy map.
- For the chosen commodity, check the prices of the Import and Export markets. Calculate the best profits. Here, Hual → Tellus allows you to make 2,040 Cr profit per unit one way selling Gold.
- For the return, do the same with various commodities and shoot at the best profit.
- Congratulations, you have your ABA trading road!

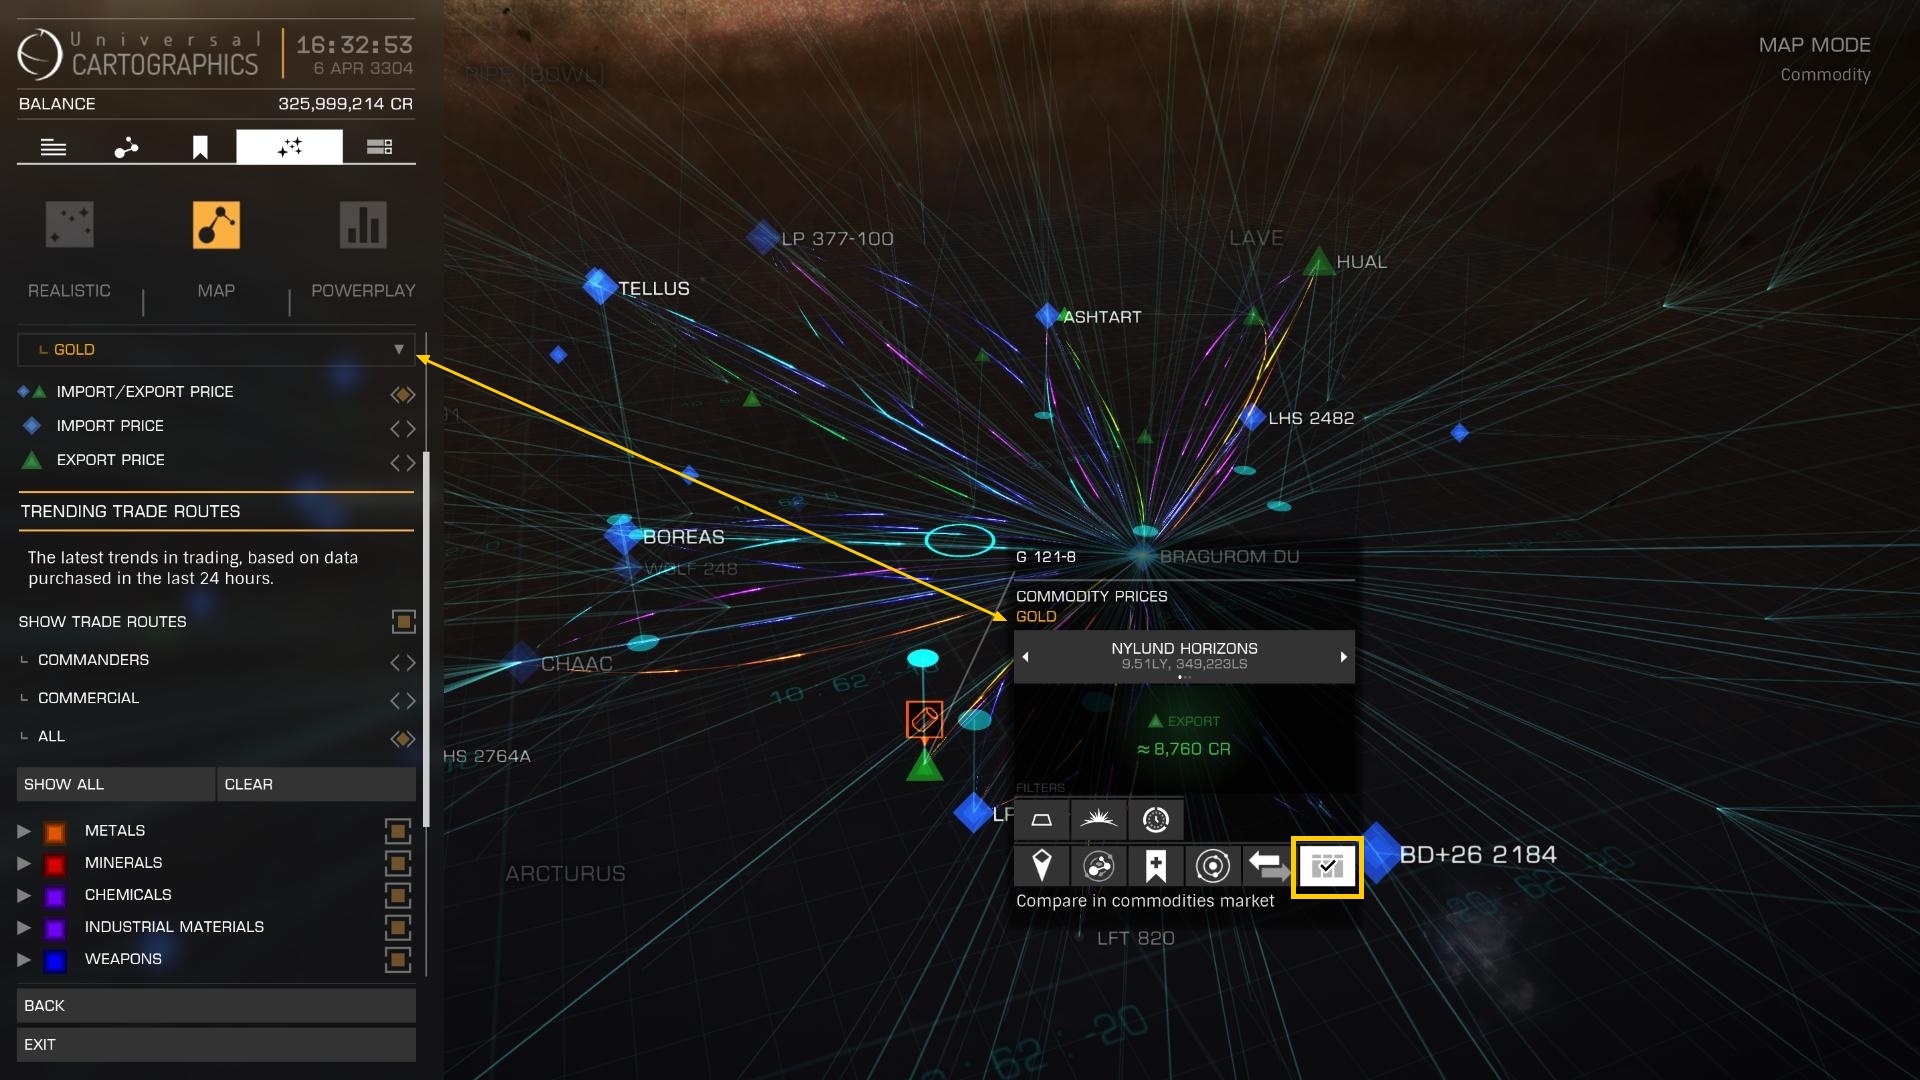
You can also evaluate the surrounding markets in relation to the station’smarket you’re currently docked in.
Just click on « Compare market commodities ».
Then open the station’s market and you will get all the prices of the commodities and the realizable profit compared to the selected market!

A good profit is between 800 credits per unit sold and 1,500 credits average per unit sold.
If you have more, bravo!
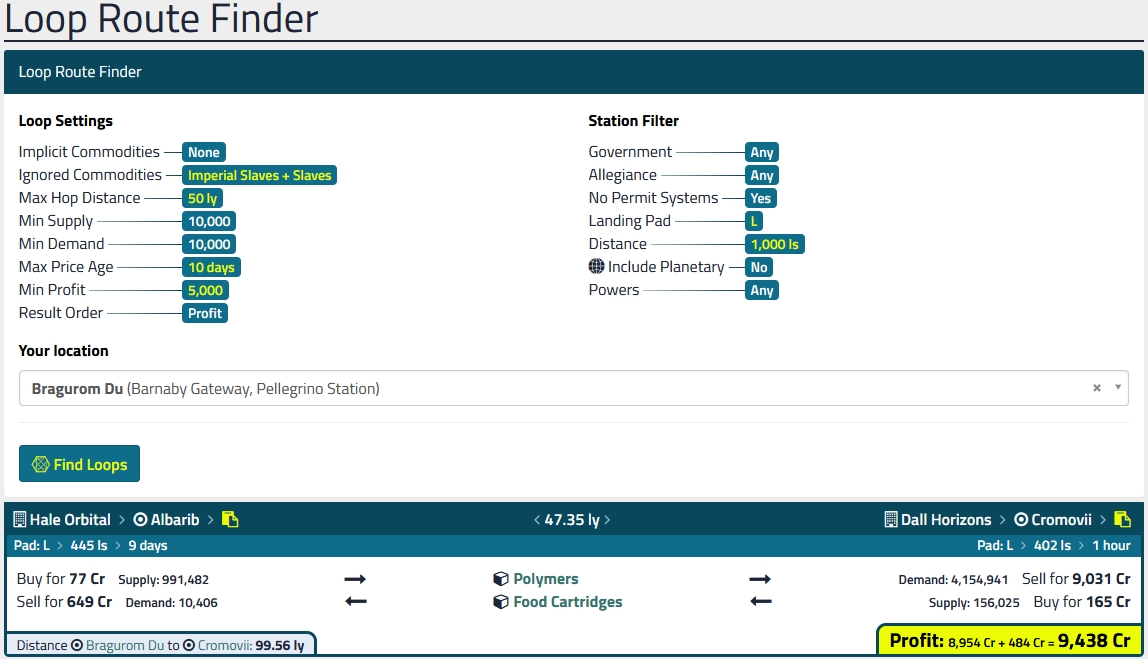
◘ With the Third Parties Tools
One of the best website for this at the moment is EDDB.io.
Open the page, select your Trading Type and then use the parameters to find a Trading route
It’s that easy!
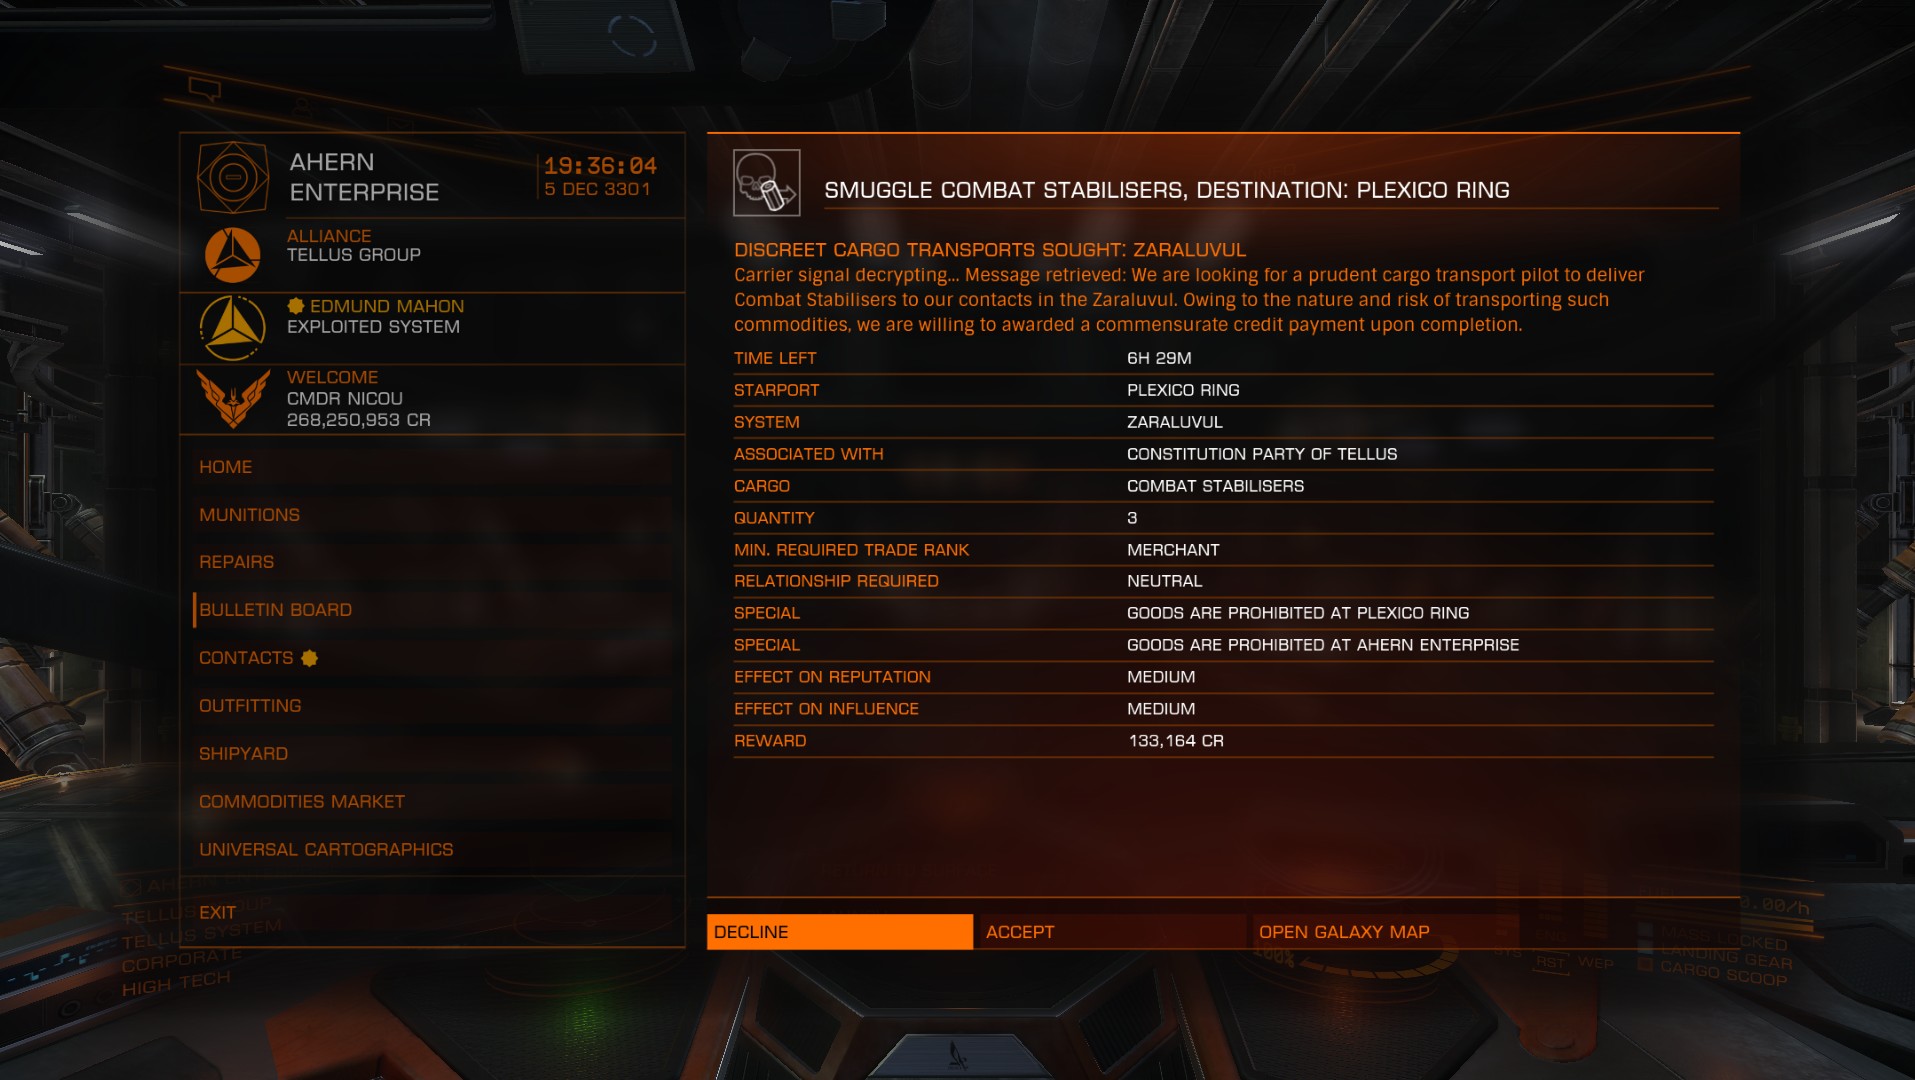
Smuggling
When you accept a smuggling mission, you will receive a target system and a haul to transport into another system. This is an illegal good, so be careful and don’t be scanned.
It’s easier with smaller ships.
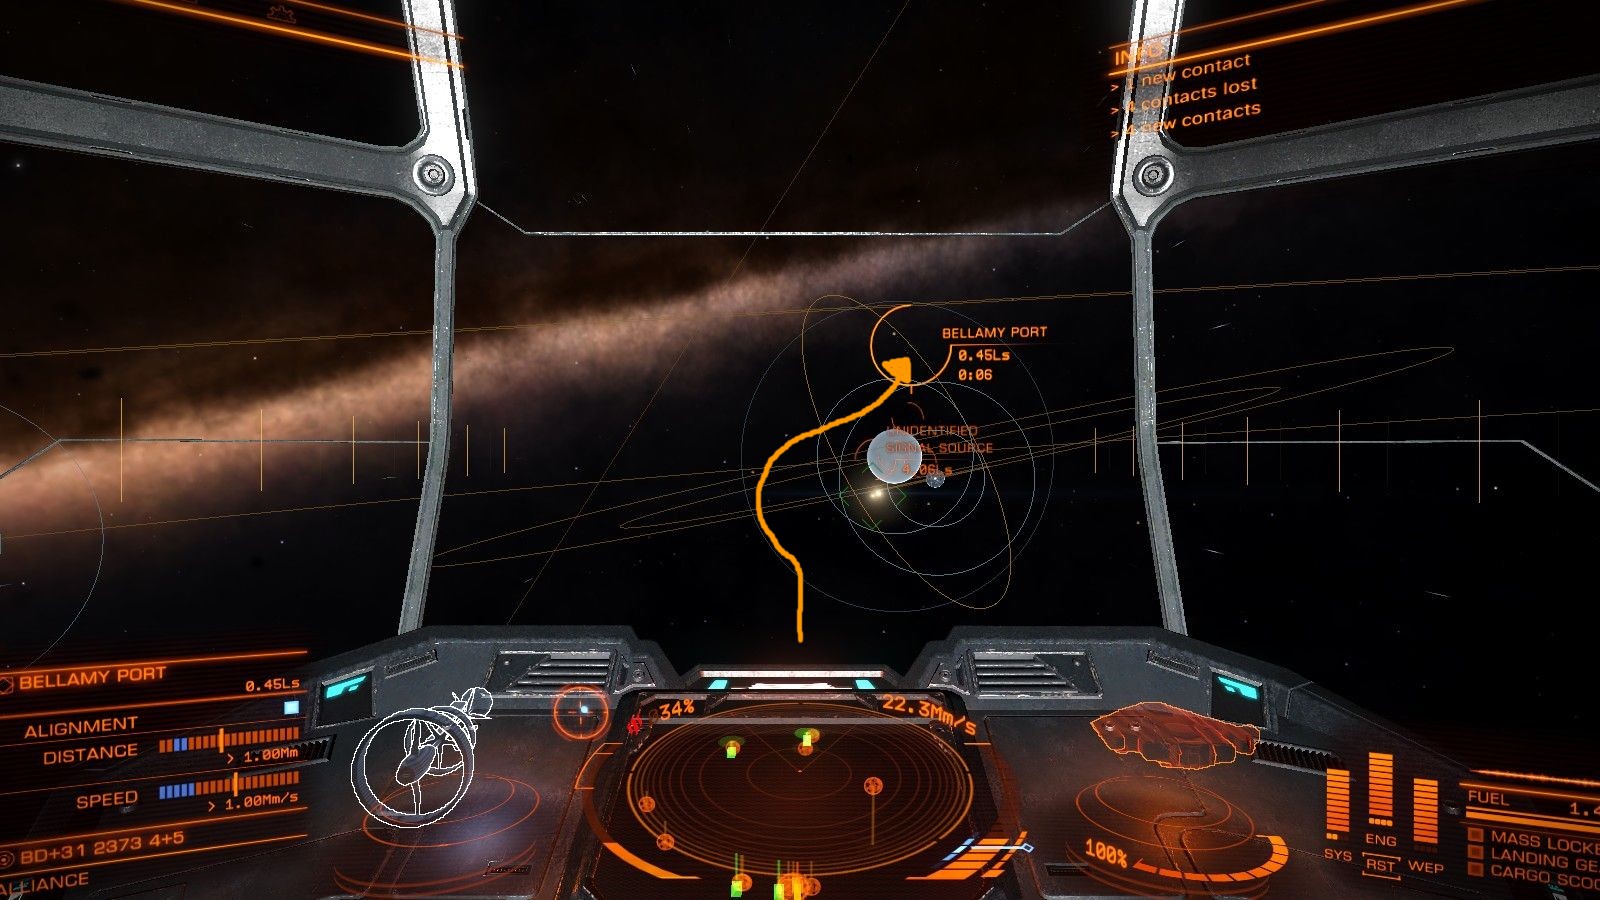
It may be required to search for that merchandise in another system if it’s a smuggling/scavenger mission. Head to the system and start searching for « unidentified signal sources » in hyper-space.
These signals appear randomly. Keep an eye on your list in the « Navigation » tab and target them as soon as they appear. Generally, if you scanned the Nav beacon, the signal will be blue.
If you do not see them just keep flying around the system, or scan the Nav beacon close to the sun. The latter will provide you with the location of the wanted item.

Before you complete your mission, do not hesitate to look for a few more « unidentified signal sources ». As I mentioned earlier, they appear more frequently if you have a mission to find them (also depend on the system’s sate).
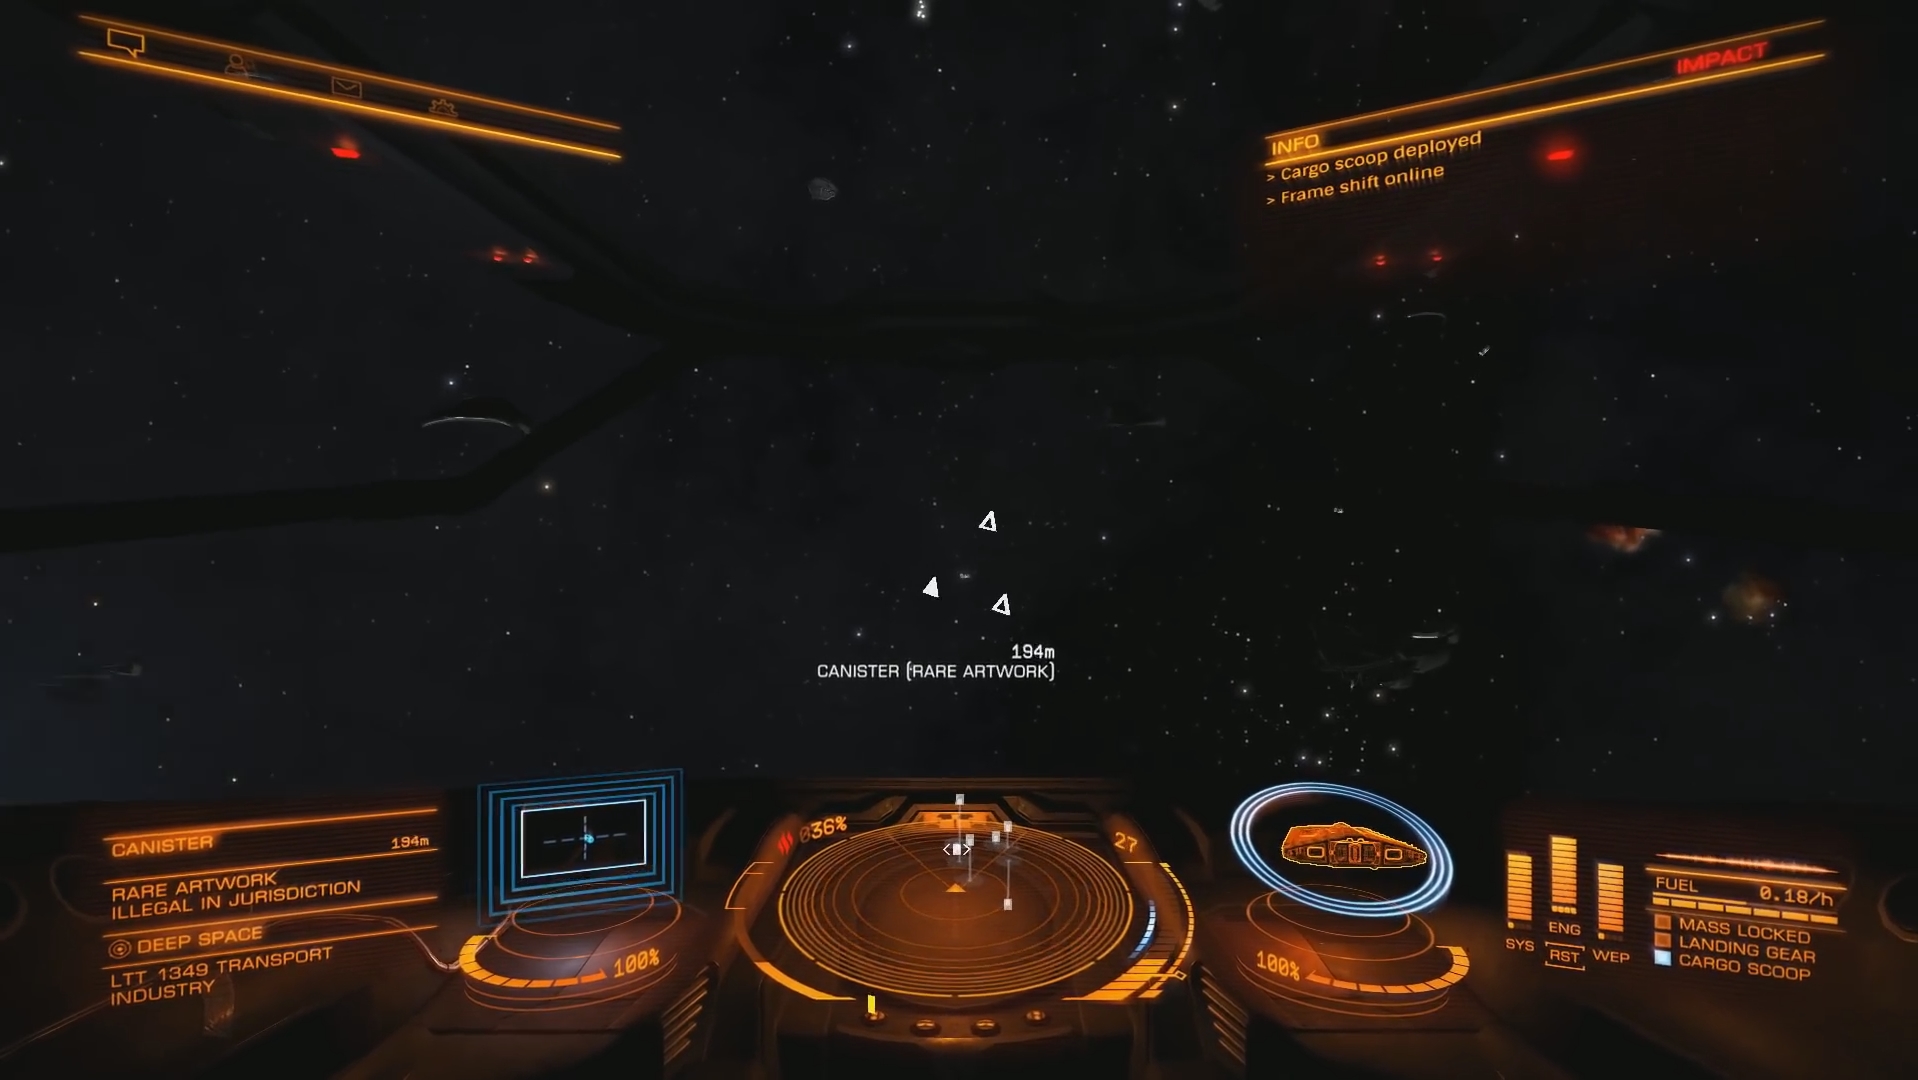
You can use it to fill your cargo hold with interesting goods like the « Ancient Artifacts ».
It is common to go out for 2 or 3 units of a resource and end up coming back with 15 or 20.
Selling the remaining to the black market or keeping some of them for another mission may be particularly profitable.
Beware of the police’s scanners, mostly around stations!
Don’t forget to use your Silence Running to go stealth; Heat sinks are recommended and you should not appear onto the police’s radar.
Locate the missions with an arrow and a container, those with skulls in the background: they are smuggling mission.
If there is no arrow, it’s a scavenger illegal mission or a pirate one.


There are also long-range smuggling missions.
Very effective in T6, Cobra or Asp, it will give you a good amount of credits!
You have to jump very far, so do not underestimate these missions. Keep your weapons and fuel scoop close.
Tips and tricks
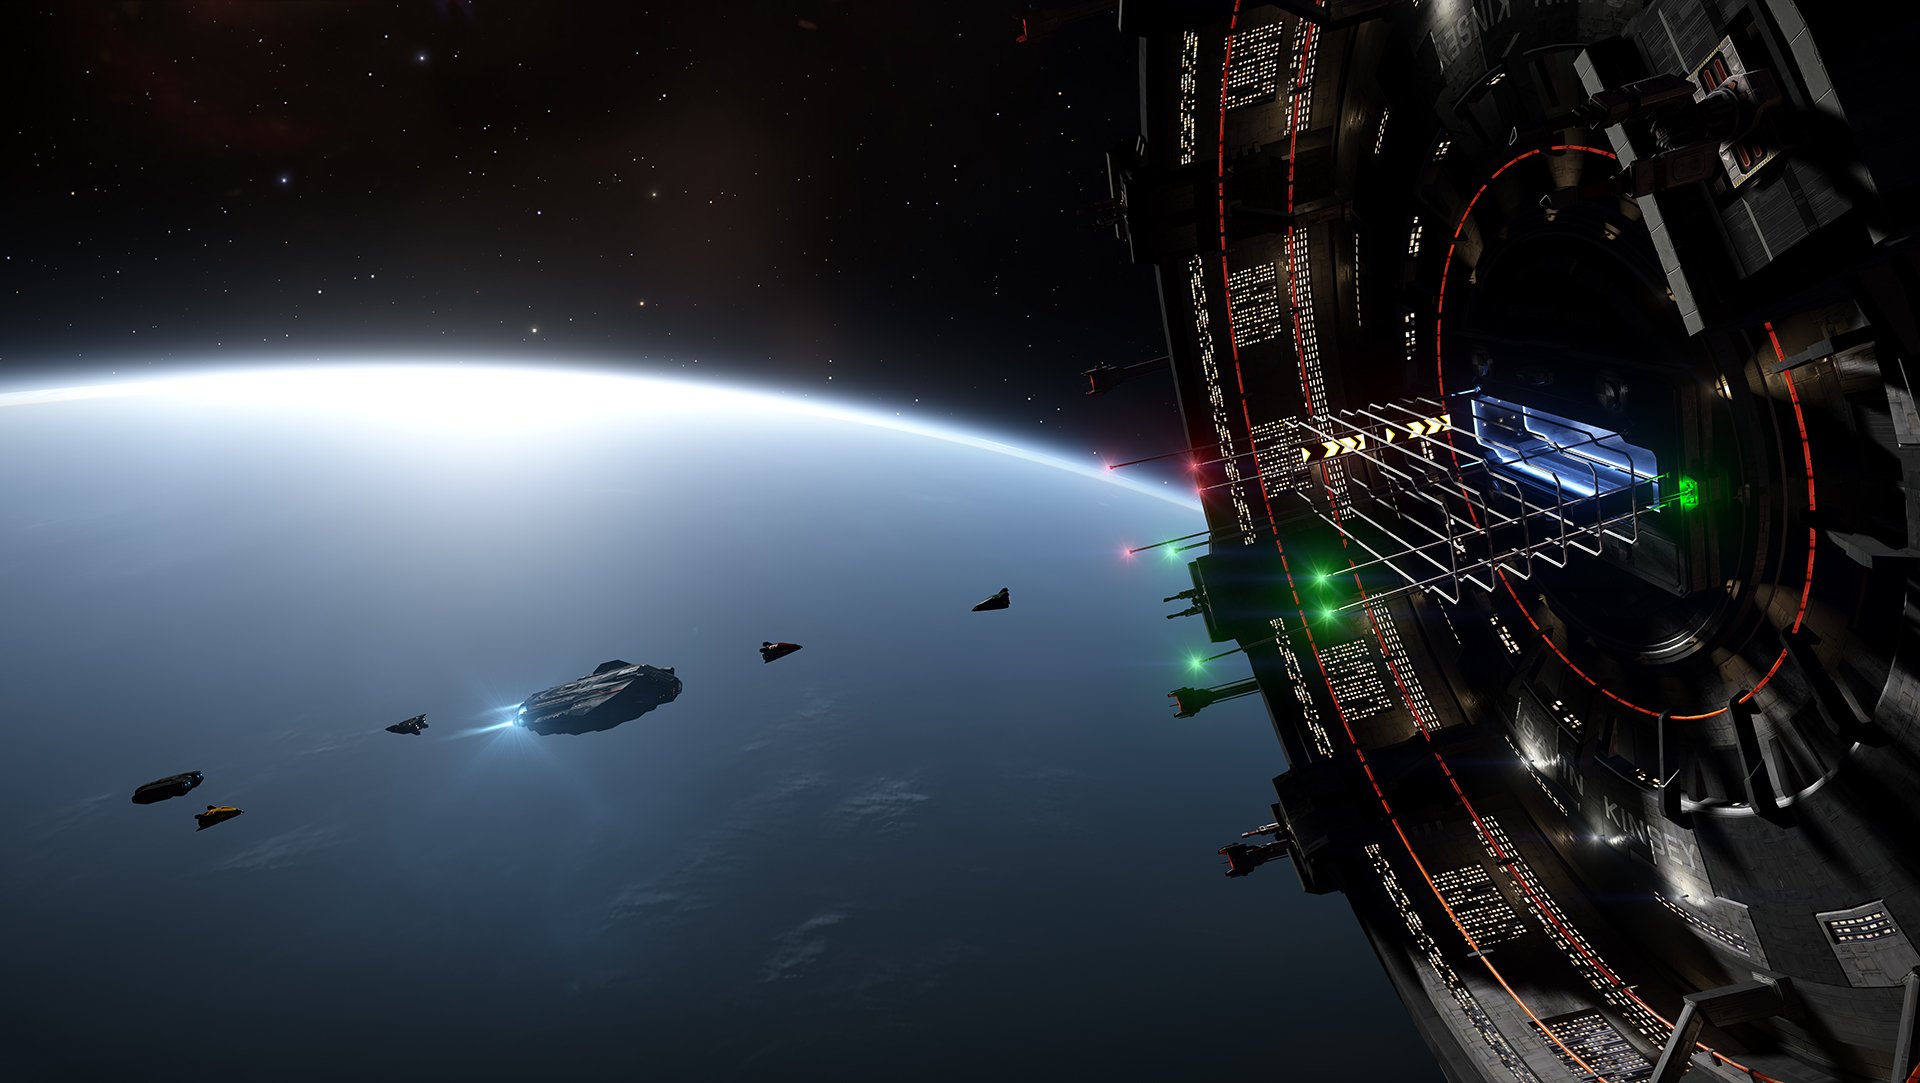
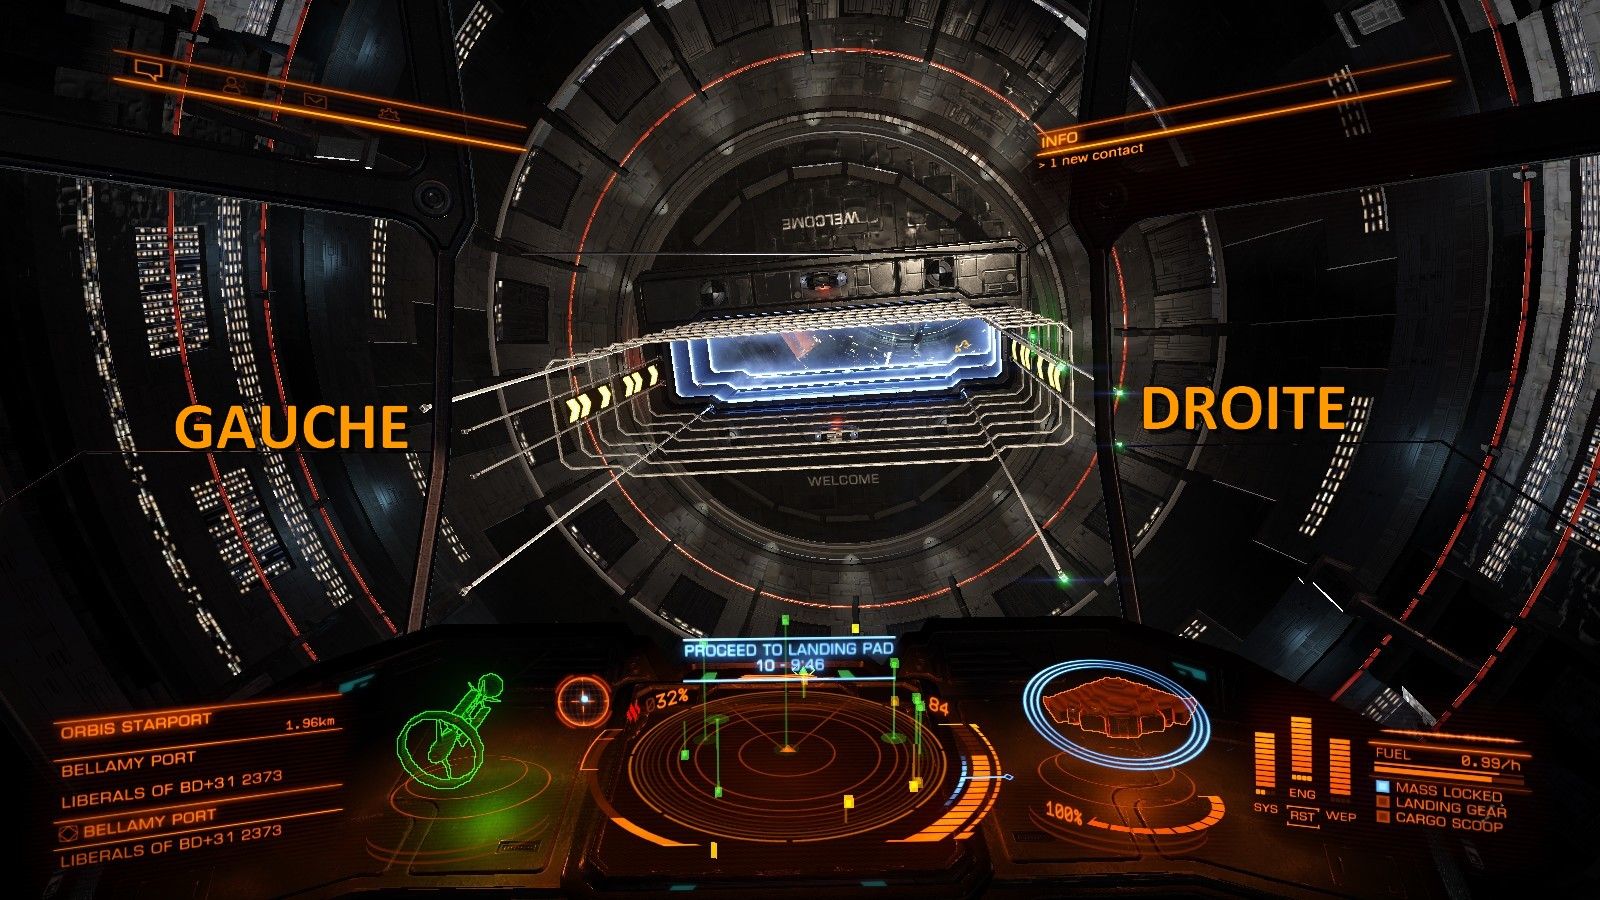
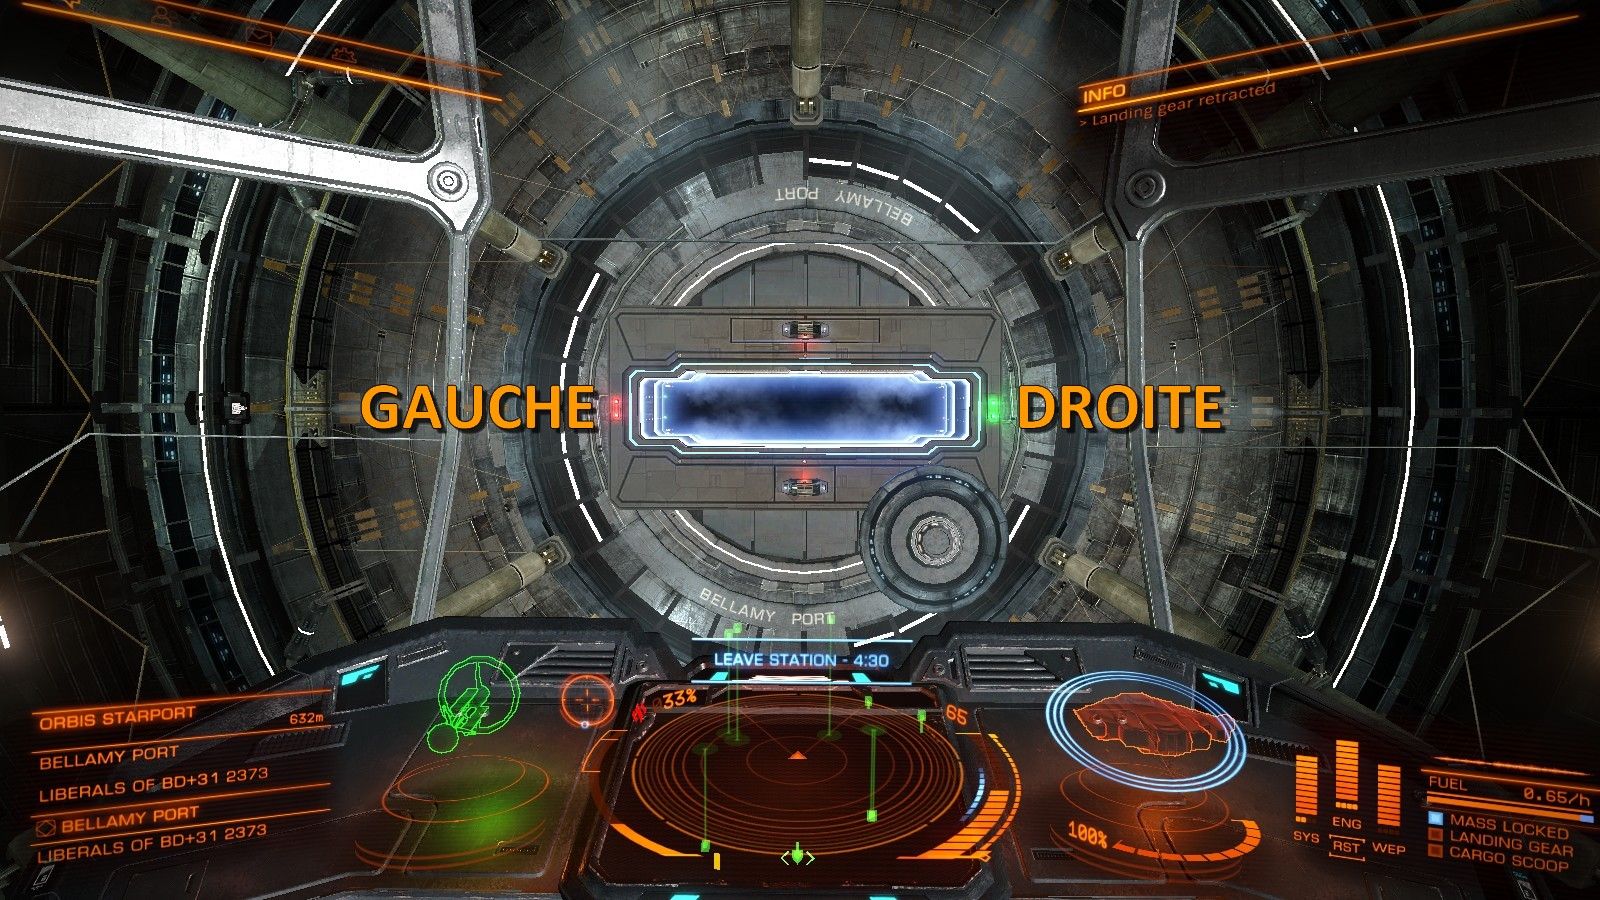
1) When you enter a station, green and red lights appear. The green should always be on the right and the red on the left in order to respect the navigation direction.
2) If your ship is massive like a T9 or Anaconda, notify your arrival at the Letterbox of the station in order to avoid collapsing with other players.
For example: « I’m docking my T9, be careful at the letterbox guys! »
3) When you trade in open and you face the star after a jump. First reflex: look at the players list! They may want to steal your hold of goods, so be sure to check their ships and outfits. A cargo-scanner means piracy.

4) If you are interdicted by a player, immediately find out which ship the enemy player owns.
- If you have a small ship, try to counter the interdiction. Bear in mind that in case of failure, your jump recharge will be very long. If so, stop and obey the pirate.
- If you have a small ship and the enemy has a slower ship than yours, submit to the interdiction, maximum speed and boost then flee! If he has a bigger ship than yours he will be able to masslock you and you will have a hard time leaving; Obey the pirate.
- If you have a big ship, do not try anything, you’re done. Submit to the interdiction and obey the pirate. A real pirate will never kill you if you obey the orders, he will ask you for some cargo… if you have any.

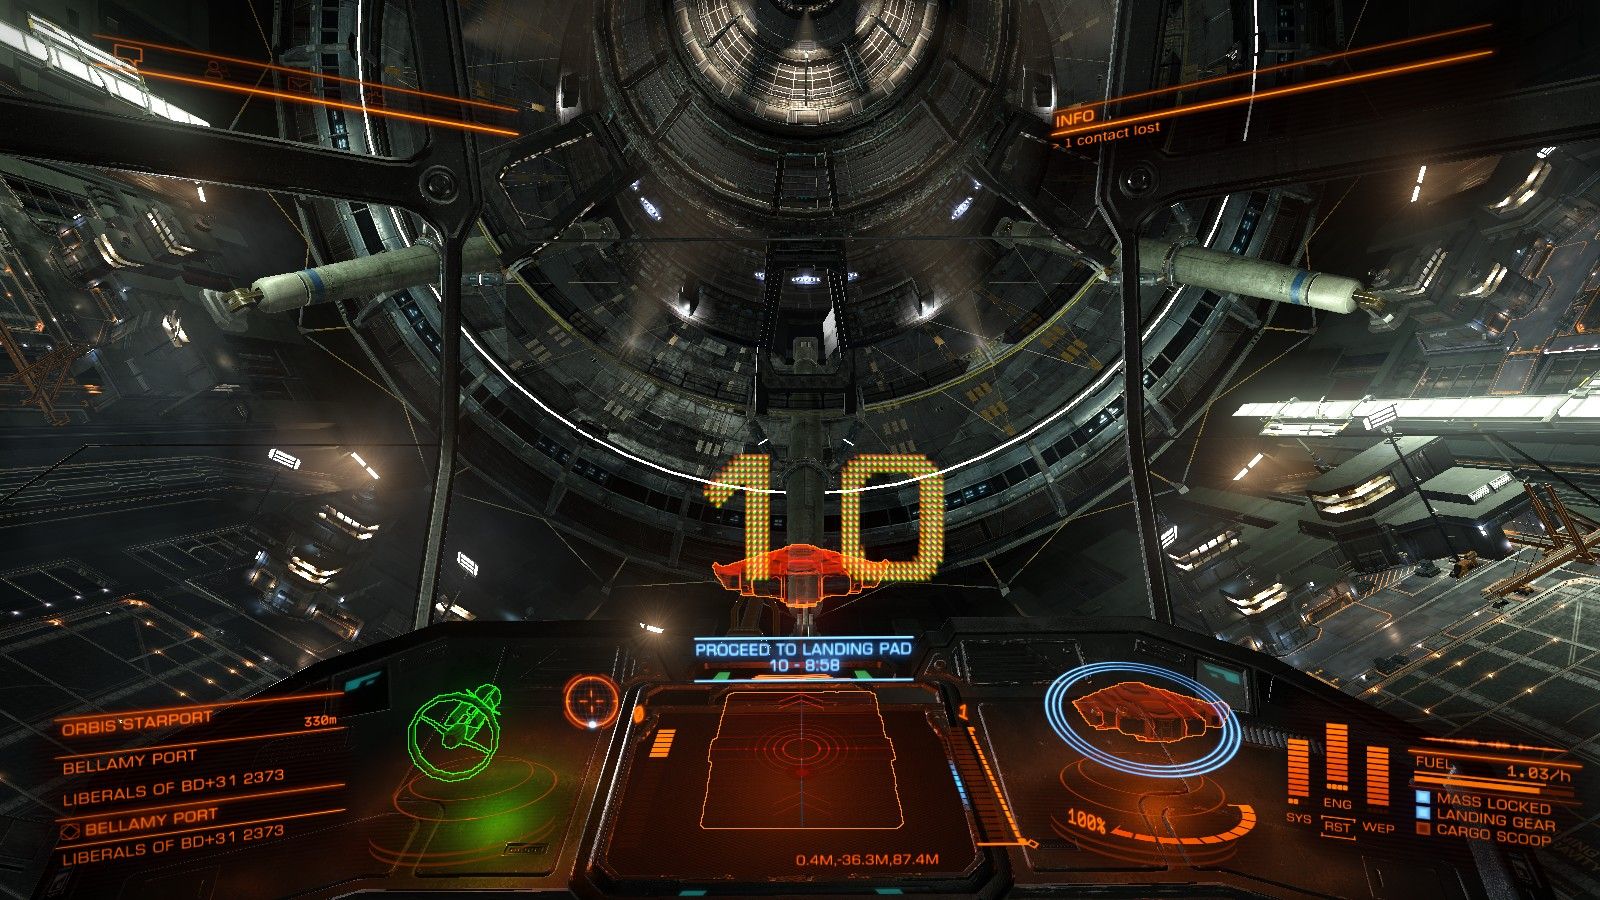
5) To approach a station, get closer by the inside of its orbit, near the planet. When you do so, you will always arrive in front of the station’s entrance. By the way when you are at 6s from the target, do not push your thrusters above 75% if you don’t want to overshoot it. 75% at 6 seconds is the perfect balance to approach safely and quickly.

6) When you trade, every second counts! Count 30s to jump from one system to another and 4 minutes to get you docked in average. If you have two jumps between your systems A→B→A, for example, it would make a round trip of 12 minutes (4′ + 4′ + (30″ x6)) = 11′ // ((jump to 1st star + jump to 2nd star + jump to final system) + 4minutes to dock) x2
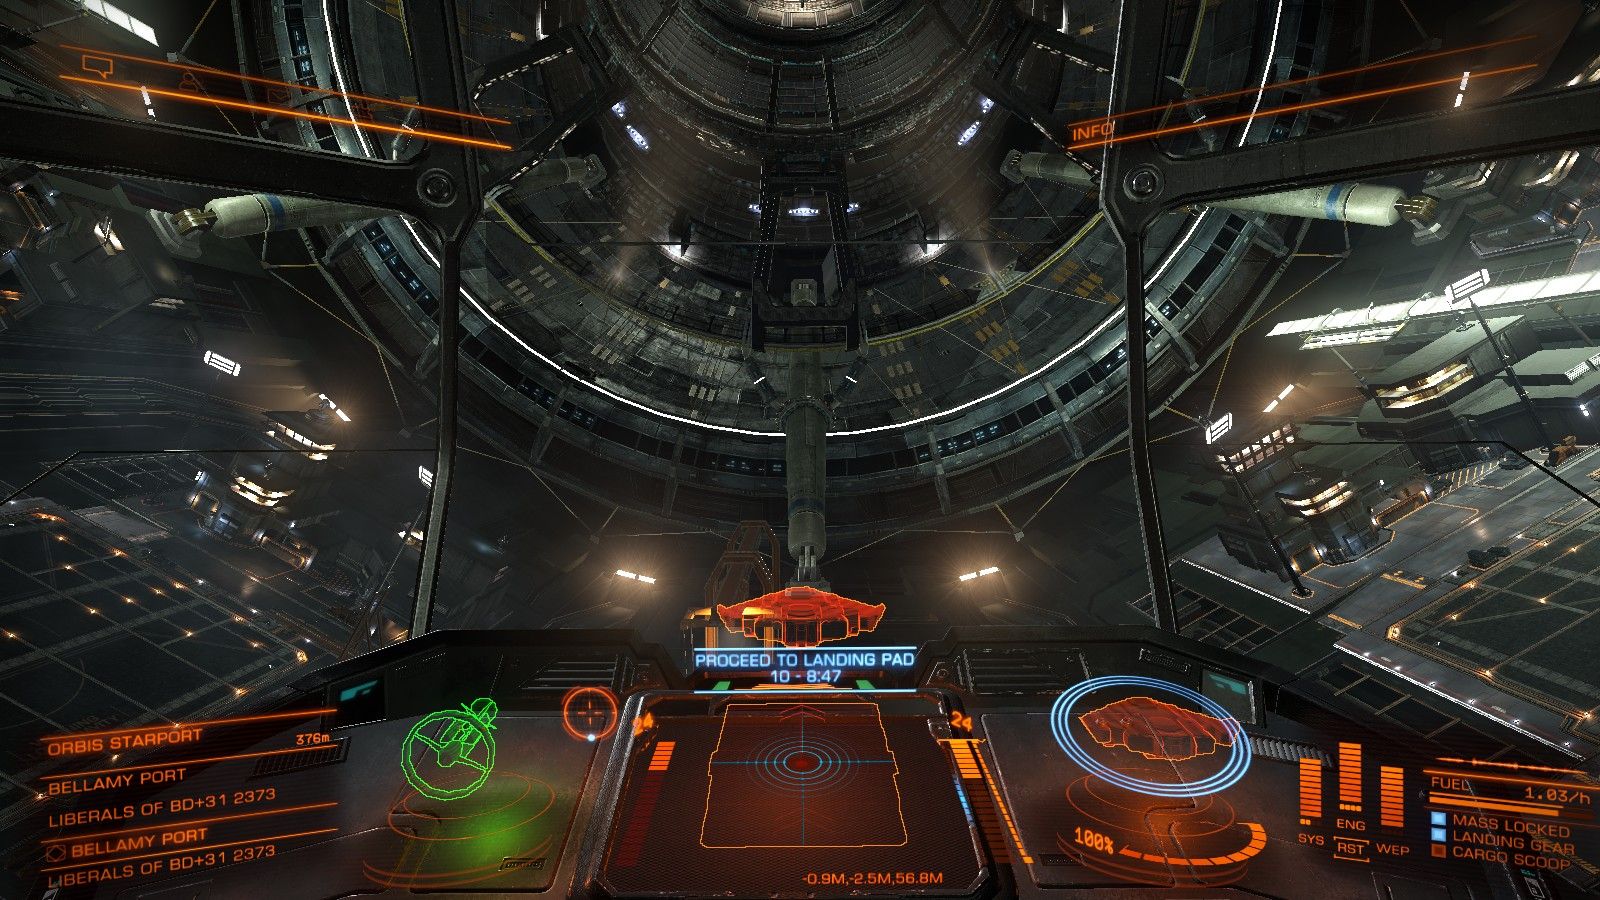
7) When you are going to land in the station, observe the reticle as depicted below. It indicates your location in order to dock you at sight.
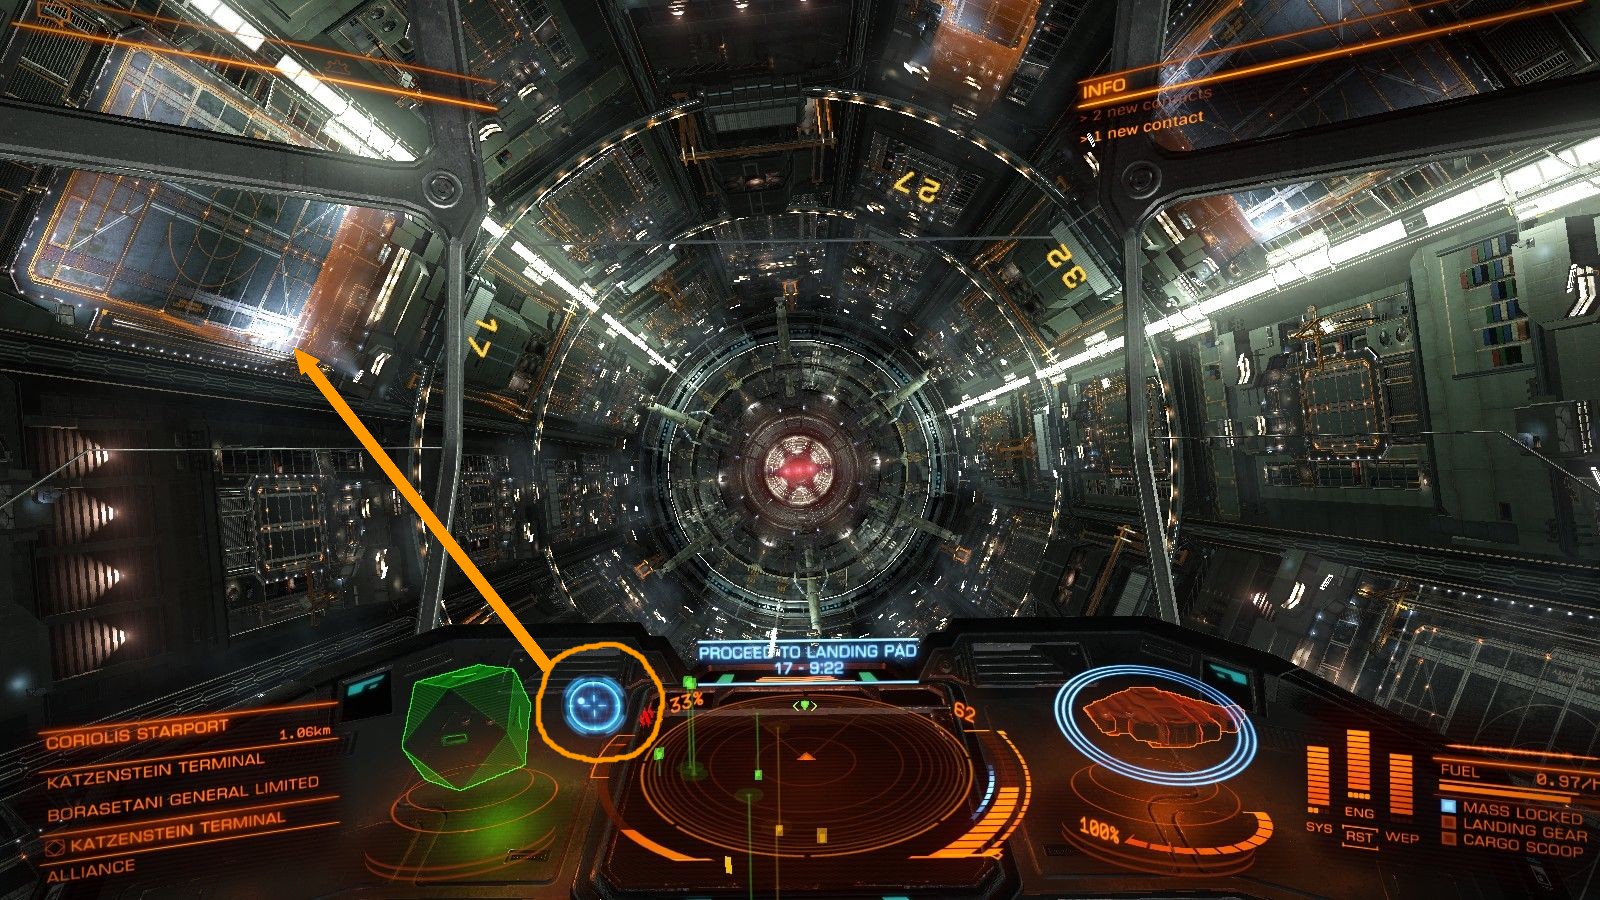
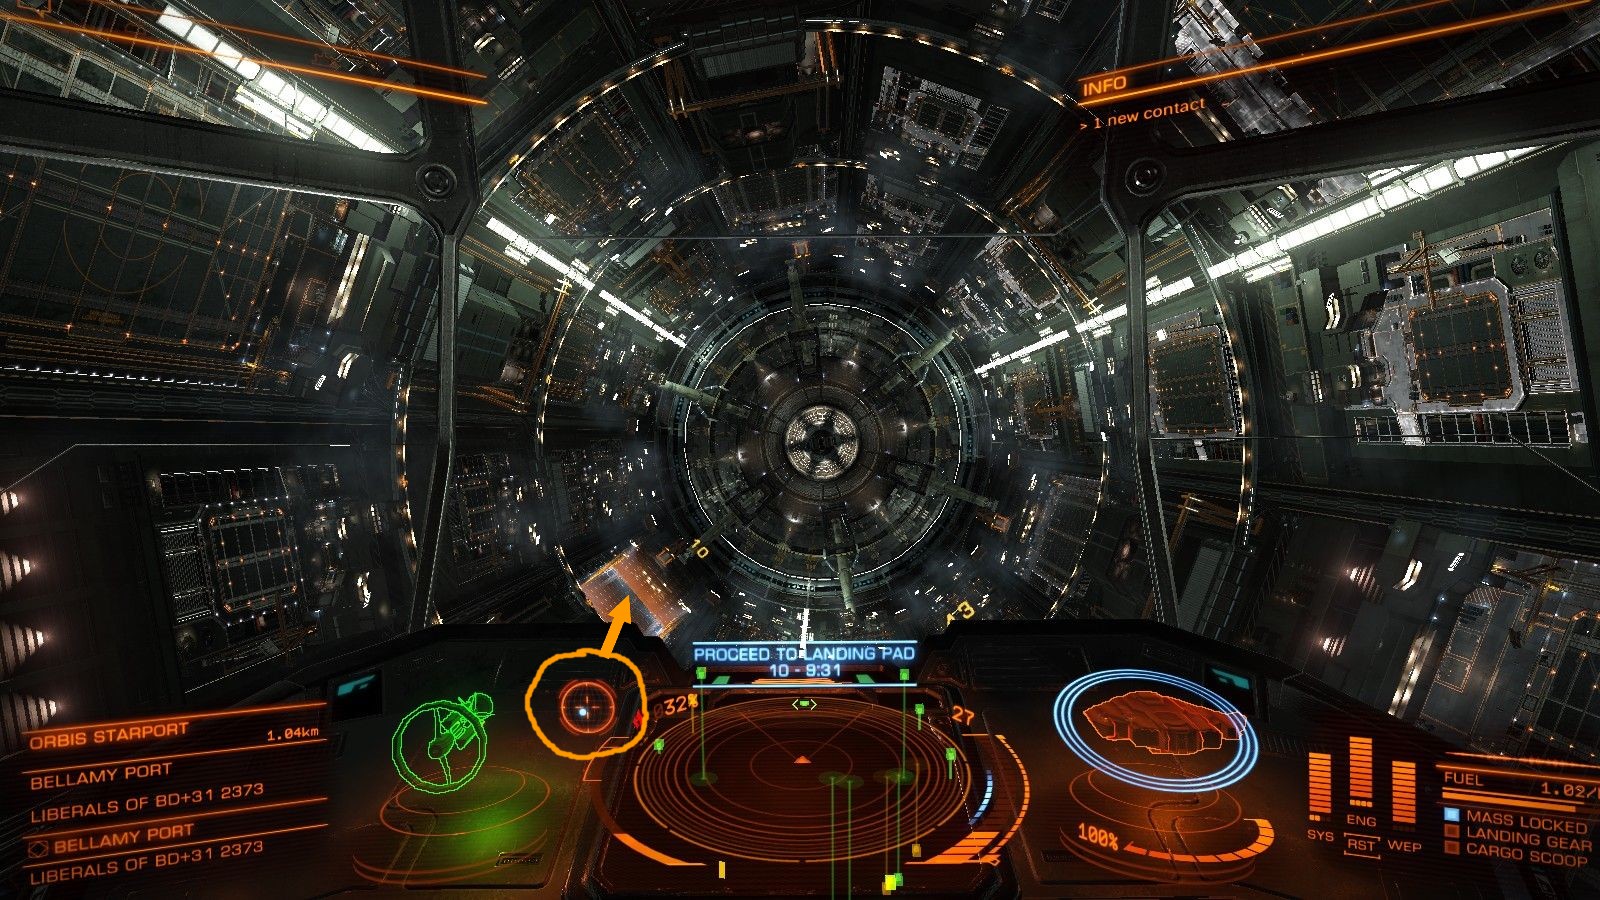
8) Again, use the reticle to perfectly land at stations. The latter will tell you where and how to place your ship.
Proceed to the white/black reticle balance (meaning in front of/behind you). The reticle must be at the bottom of the circle.
9) Several trading tools:
- Elite Dangerous Data Base (EDDB) is another well used tool;
- Same for ETN.io, depending on your taste;
Any comment on these tips or directly the Trader guide? Please share them with us!
![]()